Thursday, February 18, 2016

Whole Wheat Sweet Potato Mini Muffins


If you have been following my blog for very long, I'm sure you've noticed how much I enjoy sneaking veggies into breakfast in things like: Spinach Mini Muffins, Spinach Pancakes, and Whole Wheat Pumpkin Mini Muffins. And I'm constantly looking for more recipes like this. Just for the record, when I say sneaking, I mean that the finished product does not taste like a vegetable, not that I go out of the way to hide it from my kids. My son has helped me make spinach mini muffins many times and he knows I use lots of fresh baby spinach when I make them, and he has also seen me make these and all of the other muffins I make and often wants to help me make them, so he sees when I am adding vegetables. 

I started finding ways to include vegetables into breakfast because my 17-month-old is sort of hit and miss when it comes to vegetables, but she will always eat a pancake or muffin. This is a way to ensure she gets some vegetables every day, so I don't have to stress as much about what she's eating on days when she refuses to eat her vegetables at other meals. I also love to include veggies in breakfast just to add some extra vegetables to the rest of our diets...because who couldn't use a few more veggies in their life? 

So today I thought I'd share yet another muffin recipe...whole wheat sweet potato mini muffins! These are delicious! This is my first time trying a sweet potato muffin, and let me tell you, it will not be my last! They remind me a little of pumpkin muffins, so if you like those, you'll probably like these! Since this is the first time I've made this recipe, I'm going to call it a work in progress and will update this recipe as needed if I make any changes when I make them again. (**Updating to say I just made these for the second time, and I have made some adjustments to the recipe to make them a bit healthier. Enjoy!**) 

This recipe does require a little bit of forethought because you will need to cook a sweet potato to get 1 cup worth of puree. My favorite way to cook sweet potatoes for puree is in the crock pot. They always come out perfect and creamy and they can cook over night while you sleep! This method only works if you are cooking 3 or more sweet potatoes. If you are only cooking one (like I did this time), you can bake it in the oven. 

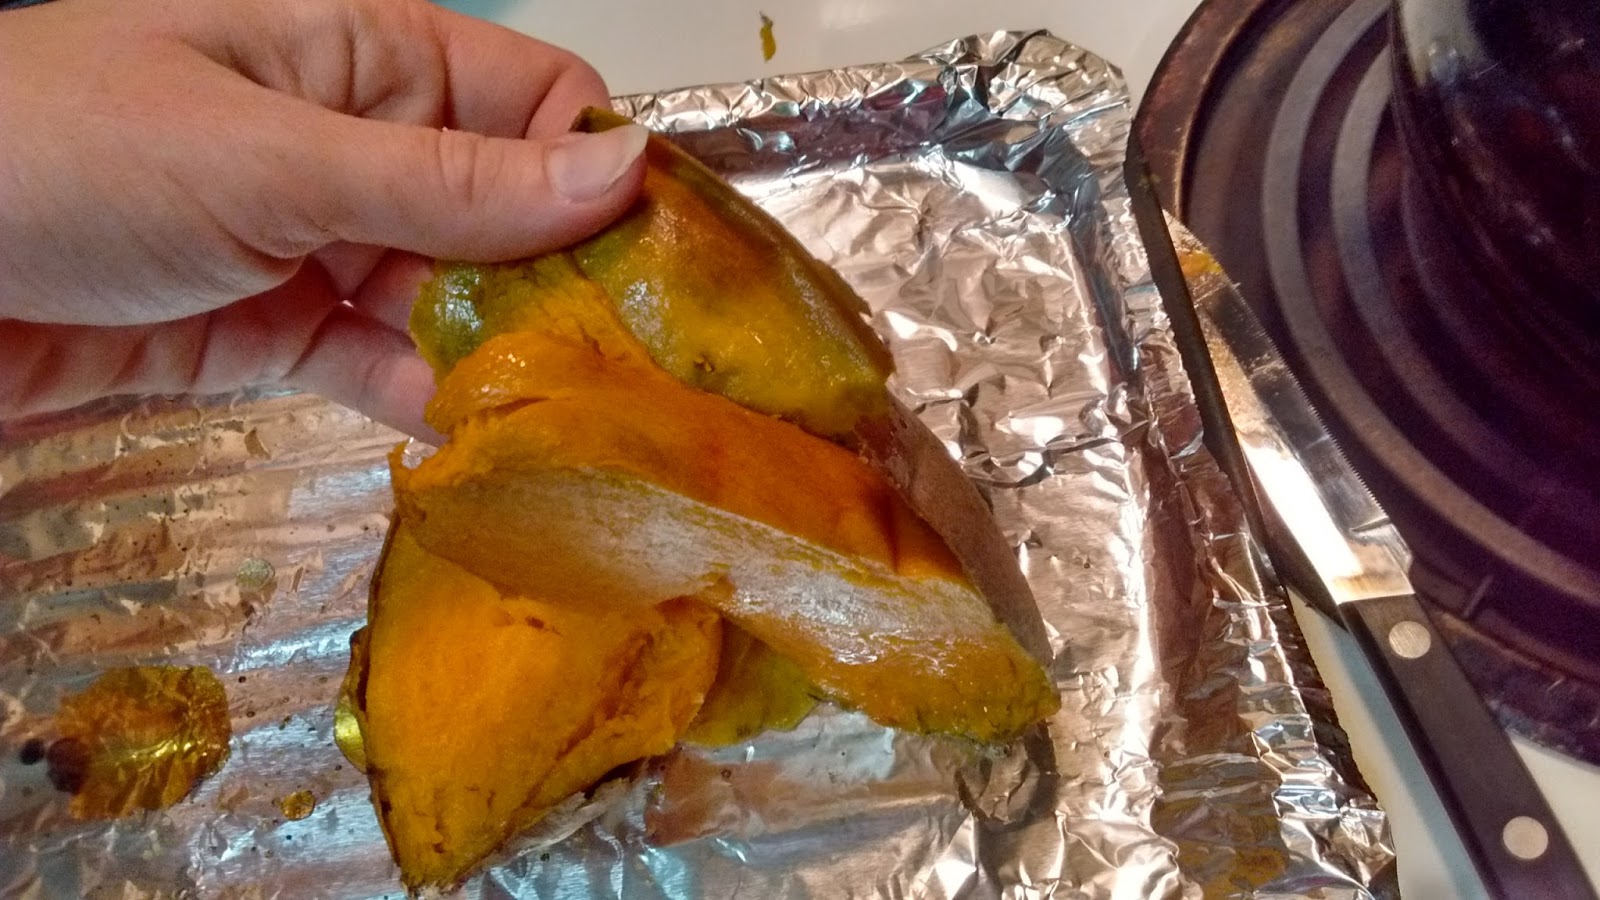
I scrubbed one sweet potato, poked holes in it with a fork, and baked it in a 400 degree oven for about an hour. 


I place the sweet potato directly on the oven rack with a pan underneath to catch the sugary juices that will ooze out while it bakes. If you don't put a pan underneath this will get in the bottom of your oven and burn, and it is a pain to clean, so please put a pan under your sweet potato when it bakes! 


Start checking it around 45 minutes for doneness...it should be very soft and the skin will start to pull away from the potato. A fork should pierce easily all the way through the skin. You will need one cup of puree after it is cooked, so choose a medium to large sweet potato if you are only cooking one.  


After the potato baked, I peeled off the skin (it will come off very easily) and mashed it up with a fork. Then I refrigerated it until the next morning. If you want a perfectly smooth sweet potato puree, feel free to use a blender or food processor. I found that mashing with a fork got the sweet potato mashed enough for me, and when all of the ingredients mixed together, there weren't any large chunks of sweet potato in the muffins. 


Now we make the muffins! Start with the dry ingredients in one bowl (white whole wheat flour, baking powder, baking soda, salt, cinnamon, ginger, and nutmeg). 


Next it's time for the wet ingredients (sweet potato puree, brown sugar, eggs, coconut oil, applesauce, milk, and vanilla). The extra milk was not included in the original recipe, but I found that the batter looked a bit dry since I used whole wheat flour. If you use all-purpose flour you may not need the milk, but use your judgment. The batter is thick, but should still be like batter and not paste-like. I reduced the sugar and oil from the original recipe as well by adding in some applesauce. I also increased the vanilla. Vanilla and applesauce help add to the sweetness, so we did not miss the 1/4 cup of brown sugar I removed! 


Now we add the dry ingredients to the wet ingredients and mix them until they are just combined. 


Then pour into greased or paper-lined mini muffin tins and bake at 375 degrees for 10-12 minutes. 


The tops of the muffins should spring back when you touch them lightly and a toothpick inserted in the center should come out clean. 


Like pumpkin muffins, these are actually more moist and taste better the next day, so don't be alarmed if they seem a little dry when you first bake them. A little butter on the top of the muffins goes a long way if they seem a tad dry the first day. 


I had some cinnamon-sugar butter that I put on a few of the muffins. (See the shiny ones in the above pictures?) They looked and tasted so good that I decided to butter the rest. 


They are delicious muffins, and my kids loved them! Give these a try...you won't be disappointed! 


Whole Wheat Sweet Potato Mini Muffins
Adapted from: babble.com 

Ingredients
1 3/4 cups white whole wheat flour
1 1/2 tsp. baking powder
1/2 tsp. baking soda
1/2 tsp. salt
1 tsp. ground cinnamon
1/2 tsp. ground ginger
1/4 tsp. ground nutmeg
1 cup sweet potato puree*
1/2 cup packed brown sugar
2 large eggs
2 Tbsp coconut oil, melted and cooled (or canola oil) 
1/4 cup unsweetened applesauce
2 Tbsp milk
2 tsp. vanilla

Directions
Preheat the oven to 375°F. Spray mini muffin tin with cooking spray or line with paper liners.

In a small bowl, whisk together the flour, baking powder, baking soda, salt, cinnamon, ginger, and nutmeg. Set aside. 

In a separate large bowl, whisk together the sweet potato puree, brown sugar, eggs, oil, applesauce, milk, and vanilla. 

Add the flour mixture to the sweet potato mixture and stir just until combined. 

Spoon into prepared muffin cups, filling about 2/3 full. Bake for 10-12 minutes, until golden and springy to the touch. Makes about 35 mini muffins. 

*To make the sweet potato puree, I baked one sweet potato at 400 degrees for about an hour, until it was very soft. I then peeled the skins off and mashed it up with a fork. You could also puree it in a blender (with the milk or applesauce if needed) to get a smoother consistency. 


Monday, February 8, 2016

Sauteed Cinnamon Apples

The "recipe" I decided to share today is really more of a method than a recipe. It's so simple to make, and I never measure anything. I've actually been meaning to post this one for a while...I make these apples often and they are so delicious! My 3-year-old lovingly refers to these as "sweet apples." This is a great little snack or dessert for yourself and/or your kids, and it's also a great way to spruce up an apple that is lackluster. I am very particular about my apples...I want them to be sweet, juicy, and crisp. Mushy and bland apples just do not work for me. My kids love fruit, and they eat a lot of it each day, so most mornings the three of us will split a sliced apple. When the apple doesn't taste as great as it could, here's how I doctor it up! 


First put some coconut oil in a small pan and set it over medium heat. I use probably half a Tablespoon. I do not measure though, just spoon some in. You want there to be a thin layer across the bottom of your pan when the coconut oil melts. I have a small cast iron skillet that is the perfect size for sauteing one apple, so that is what I use. If you don't have coconut oil, butter would be delicious. 


Spread the oil out evenly on the bottom of the pan, and put in your apples in a single layer. 


Then I sprinkle a little bit of cinnamon on top of these apples and just let them cook for a bit. 


Once the apples start to brown on the bottom, flip them over and sprinkle the other side with cinnamon. 


Then let the other side of the apples brown for a few minutes. When they are browned to your liking, sprinkle on a little bit of brown sugar. I probably use less than one teaspoon total. You don't need much, I just love the brown color and little bit of caramel-y flavor the brown sugar gives the apples. If you don't like using sugar, I'm sure maple syrup or honey would also be delicious, or you can just leave it out if you prefer. 


 Then I just stir them around to melt the sugar and cook the apples until they are as brown as I like them. 


Try to let them cool before eating them...it will be hard to resist. They smell amazing! Make sure they are cooled off before you put the plate within little hands' reach...an apple thief was caught on camera at my house! 


 Who could resist that little apple-filled face? 


The little princess loves her apples as well! 


Sauteed Cinnamon Apples 

Ingredients
1 apple, sliced 
1/2 Tbsp coconut oil 
Cinnamon, to taste
Brown Sugar, to taste 

Directions
1. Melt coconut oil in a small skillet over medium heat. Add apple in a single layer, and sprinkle with cinnamon. 
2. Cook until the apple is browned on the first side, then flip over and sprinkle cinnamon on the second side. 
3. Sprinkle with a little brown sugar and stir to melt. Let the apples cook until they are as brown and soft as you like them. Let cool and serve! 


Thursday, January 28, 2016

Peanut Butter Bran Muffins


Hello again! I can't believe January is almost over! We're back to the grind again here at my house. My husband has started back to school, so most of the time it's me and the two kiddos hanging out. If you've been following my blog for any amount of time, you've probably picked up on the fact that I love muffins! Love them! I would (and mostly do) eat a muffin of some sort for breakfast every morning. Since I have muffin-loving children as well, I like to make muffins that are at least mostly healthy. There are a few that are in my regular rotation...as in I make them every other week or so. I've shared a couple of these already like Spinach Mini Muffins and Whole Wheat Pumpkin Mini Muffins. I'd like to share a third with you today...Peanut Butter Bran Muffins. I actually cannot believe how delicious these are. I mean, really...it's a bran muffin! I remember seeing brown, strange looking bran muffins at my grandmother's house when I was younger. They never looked or sounded appealing, but I promise these bran muffins are a totally different story! 


I found the original recipe on Weelicious, a fantastic blog where I get very many of my recipe ideas. I had purchased a container of Sunflower Seed Butter from Trader Joe's hoping my son would like it for a little variety on his then daily peanut butter and jelly sandwich. Unfortunately he did not care for it, and I did not like it enough to just eat it as is, so I was left to search for some way to use it. There are lots of recipes available using this particular seed butter if you look for them, and one that sounded very appealing to me was the Sunflower Butter Bran Muffin recipe on Weelicious. They were so tasty that I used the rest of the sunflower seed butter to make the muffins a few more times. Eventually, I ran out of the sunflower butter, and since I did not intend on buying it again I decided to try it with peanut butter, which I always have on hand. Yum...what a fantastic muffin recipe! I have since also tried making these with almond butter, which is also delicious! I have made a few tweaks to the recipe in the several times I have made them to make them even healthier, and I am excited to share them with you! So let's get to muffin making! 

Start by measuring 2 and 1/2 cups of bran flakes into a large bowl. You can find these on the cereal aisle. I use these: 


Pour 1 and 1/4 cup milk into the bowl with the bran flakes, and I stir it around a little to make sure the bran flakes are coated. Let this soak together for 5 minutes. The milk will soften the bran flakes, so the finished muffins won't have a crunchy cereal texture to them. 


After the 5 minutes have passed, whisk in one large egg, 1/2 cup of brown sugar, 1/4 plus 1 teaspoon of oil (I use canola oil or coconut oil that I melt in the microwave and let cool), 1 teaspoon of vanilla extract, and 1/2 cup of creamy peanut butter. Feel free to use any nut or seed butter you like. I have made these with sunflower seed butter, peanut butter, and almond butter and they have all been delicious! I imagine you could use maple syrup or honey in place of the sugar, but that will make the mixture more wet, so you may want to decrease the amount of oil or increase the amount of flour or flax seeds that you add. 


Next, since these are muffins, we need to measure and whisk together the dry ingredients in a separate bowl. So into a small bowl measure 1 cup of flour, 1 Tablespoon of ground flax seeds, 1 Tablespoon of baking powder, and 1/2 teaspoon of salt. I use white whole wheat flour, but you could use all-purpose flour if you prefer. I imagine spelt flour would also work, though I have not tried it yet myself...I have a brand new bag of spelt flour in the freezer, and it's on my list of things to try, so I'll post about it as soon as I do! 


Next take your dry ingredients and add them to the large bowl with the wet ingredients and mix it all together gently until it is just combined. As always when you are making muffins you don't want to over mix the batter. 


Then gently fold in 1/2 cup of mini chocolate chips. These were optional in the original recipe, but they are not optional for me! The chocolate chips are so delicious in this that I do not make this recipe unless I have mini chocolate chips in my pantry! 


Next pour the batter into a greased mini muffin tin, filling each cup about 2/3 full. I grease mine with coconut oil spray. 


Bake these for about 12 minutes, or until a toothpick inserted in the center comes out clean. The toothpick will come out mostly clean...sometimes you hit a chocolate chip, so it will come out with melted chocolate on it, and that's okay. You just don't want wet batter on the end of the toothpick when you pull it out. Generally muffins will spring back when you gently press the top of them, so that is another way to check for doneness. 


These muffins are best served warm! When I eat them leftover I always nuke them in the microwave for a few seconds so the chocolate gets nice and melty! They also freeze very well. I would definitely freeze them if you don't finish them within 3-4 days. Just place them on a baking sheet and freeze for an hour or so, then move them to a labeled ziploc freezer bag. 


Here's a little tip: This recipe will make more than 24 mini muffins, but less than 48, so if you use a 24-mini muffin pan to bake your second batch you will have some empty cups. I fill mine about half way full with water to protect the pan and to make it easier to clean. 


My 16-month-old daughter adores these muffins as do my husband and myself! These are not my 3-year-old son's favorite muffins for some strange reason...he has tried them a few times and does not care for them. However everyone else that tries them loves them and asks for the recipe! I always pull out some kind of leftover frozen muffins for my son to have when I make these. I'm sharing the fact that he doesn't like these because sometimes kids (and anyone for that matter) just don't like things, and that's okay! He eats a wide variety of foods and is open to trying new things, so I am okay with him not liking these...that does not stop me from making them regularly for the rest of us though! 


Peanut Butter Bran Muffins
Adapted from Weelicious 

2 1/2 cups bran flakes
1 1/4 cups milk
1 large egg
1/2 cup brown sugar
1/4 cup plus 1 teaspoon canola oil or coconut oil (melted and cooled) 
1 teaspoon vanilla
1/2 cup creamy peanut butter (or any nut or seed butter you like) 
1 cup white whole wheat flour
1 Tablespoon ground flax seeds 
1 Tablespoon baking powder
1/2 teaspoon salt
1/2 cup mini chocolate chips 

1. Preheat oven to 400 degrees. Spray a mini muffin tin with non-stick spray. 
2. Combine the bran flakes and milk in a large bowl and let sit for 5 minutes.
3. Whisk the egg, brown sugar, oil, vanilla, and peanut butter into the bran flake mixture. 
3. In a separate small bowl, whisk together the flour, flax seeds, baking powder and salt.
4. Add the dry ingredients to the wet ingredients and mix until just combined. Fold in the mini chocolate chips. 
5. Pour into prepared mini muffin pan, filling about 2/3 full and bake for 12 minutes, or until a wooden toothpick inserted in the center comes out clean. 

Wednesday, January 27, 2016

Meatless Tomato Sauce for Pasta or Pizza!


I don't think I've mentioned it yet, but my husband has started eating a Paleo diet over the past couple of weeks. His best friend is getting married in March, and the two of them have entered a slap bet. For those of you who have never heard of such a thing, it comes from the show "How I Met Your Mother," which is one of our favorite sitcoms! We have watched it so many times we can recite most of the episodes by memory! There is a running slap bet on the show between two of the characters...they had a bet over something and whoever one the bet got to slap the other one as hard as he could in the face. Of course, since it is a sitcom, it becomes much more complicated and drawn out. The slap bet between my husband and his best friend has to do with the two of them losing weight and getting in better shape for the wedding. Basically whichever one of them loses the most percentage of body weight gets to slap the other in the face as hard as he can! This resulted in my husband switching over to a Paleo diet for the time being, so he is eating no grains at this time. It has been quite an adjustment, but he is doing very well and is losing weight like crazy! 

While the hubby is doing this Paleo thing, the children and I are not, so I am trying to make things that he cannot have but loves when he is not at home. I had a small pizza dough in the freezer, so I decided to make the kids and myself some cheesy garlic bread for lunch. We make homemade pizza dough quite often. It is easy to make and always delicious. I use this recipe from Lauren's Latest, and I use half all-purpose flour and half white whole wheat flour. It is a great pizza dough recipe! I tried several different pizza sauce recipes, but I was always disappointed with the results. One time I had some leftover meatless pasta sauce in the refrigerator, and I thought I would try it as the sauce on my pizza. I am so that I did! It turns out that this was exactly the sauce I was looking for! It is also delicious as a quick pasta sauce or a sauce to go along with something like chicken or eggplant parmesan. Here is how I make it! 

First, put some olive oil in a skillet. I halve the original recipe because I find that it makes more than enough for a small batch of pasta or as a pizza sauce. If you are making it to go with pasta as a main dish or if you will be making several pizzas, by all means double my recipe. The sauce also freezes well, so you could make the full recipe and freeze what you don't use. I like to freeze this sauce in small portions to use for future pizzas. So anyway back to the olive oil...I'd say I put about 1 and 1/2 to 2 Tablespoons of oil in the pan. I did not measure it, just drizzled it in. Heat this over medium-low heat. 


Then grate in 1 to 2 cloves of garlic. I used 2 cloves of garlic. We LOVE garlic, and grating it really gives an intense garlic flavor. If you prefer less of a garlic taste, you might want to just smash the garlic cloves slightly and let them cook a bit in the oil and then remove them before adding in the other ingredients. As I said before we are big garlic fans, so 2 cloves of garlic grated in is what I used. 


Next add in a pinch of crushed red pepper flakes. Before I had kids I used more like 1/4 to 1/2 teaspoon of red pepper flakes, which resulted in a very spicy sauce. Since my kids eat this, and I don't want to overwhelm them with spice, I use only a pinch. 


Let this cook together for a few minutes until the garlic is golden and it smells wonderful. You don't want to have the heat too high or you will burn the garlic and red pepper, and that is not a good thing. If you've ever had burnt garlic you know what I'm talking about...it is strong and bitter. So keep the heat around medium low. At this point you can add in a splash of chicken broth or white wine. I usually use chicken broth since I am much more likely to have that on hand, but it is delicious both ways. The exact measurement of "a splash" here would be 2 Tablespoons plus 2 teaspoons, but I have made this dish so many times I really don't measure anymore and just add in a splash. You are going to let this cook down anyway until it is almost all cooked out to intensify the flavor. 


After your broth or wine has cooked down and the pan has much less liquid in it, add in 1 (14.5 ounce) can of crushed tomatoes. You could use pretty much any tomato product that you have on hand here...diced tomatoes, whole tomatoes (I would chop them or squish them by hand before adding), tomato sauce, etc. I like crushed tomatoes and that is what the original recipe calls for. 


After you add the tomatoes, season it with salt, pepper, sugar, and a pinch of Italian seasoning. I don't measure the salt and pepper...I just add probably 1/2 teaspoon of salt and maybe 1/4 teaspoon or so of pepper. I added in about 1 teaspoon of sugar. You will taste your sauce after it is finished cooking and add any extra seasoning if needed. Mine needed more salt and more sugar. If you don't keep Italian seasoning on hand, feel free to use oregano or basil. Or you can just leave that part out...I think it gives it more of an "Italian-y" flavor...Italian-y...or maybe Italianesque...I'm getting really scientific with my terminology here, no? :-) 


Reduce the heat to low and let the sauce simmer covered for a few minutes to let the flavors come together and that's all there is to it!


I always let my sauce simmer gently for 30 minutes or longer. I think it makes a much richer sauce. I wouldn't do that if I were in a hurry but in this case I needed to wait for my oven to preheat for the cheese sticks plus I was taking care of the kids, so I just let it simmer away for close to an hour. The sauce will get much thicker as it simmers. You don't want the heat to be too high or the sauce will burn, so check it frequently and stir it up several times. 


Like I said, this sauce has many different uses. It is my go-to meatless red sauce for pasta and pizza sauce. Today I used it to dunk my cheese sticks, and I will freeze the leftovers for future homemade pizzas. I urge you to give this one a try...it is very simple and delicious! It never disappoints! 


Tomato Sauce for Pasta or Pizza 
Recipe adapted from Rachael Ray 

Ingredients
1 1/2 to 2 tablespoons extra-virgin olive oil
1-2 cloves garlic, grated
A pinch of crushed red pepper flakes (use more if you like it spicy!) 
2 Tablespoons plus 2 teaspoons chicken stock or white wine (just a splash!) 
1 (14.5-ounce) can crushed tomatoes 
Salt and pepper, to taste 
1 teaspoon sugar, or to taste
A pinch of Italian seasoning, or to taste (can also use basil or oregano) 

Directions 
1. Heat a medium sauce pot over medium-low heat. 
2. Add extra-virgin olive oil, garlic, and red pepper and let them cook until garlic is light golden and fragrant. 
3. Add stock or wine and let cook until most of the liquid cooks out. 
4. Add in tomatoes and season with salt, pepper, sugar, and Italian seasoning. 
5. Reduce heat to low and allow to simmer until you are ready to eat it. Taste the sauce and add more seasoning if necessary. Refrigerate or freeze leftovers.